Let's Design and Build a (mostly) Digital Theremin!

Posted: 6/28/2020 7:45:20 PM
tinkeringdude

From: Germany

Joined: 8/30/2014

For me, OpenSCAD is one of those "so near, yet so far" kinds of things.  If I could clone myself, I'd give writing something similar (but better!) a shot..

That thought had crossed my mind on several occasions, to always shy away from the effort.
I roughly know how to handle geometry in software, even though it's been a while. But to go from a "computer graphics for demonstration or entertainment purposes" to produce (ancient) output formats for precise manufacturing, well it's different, and lots of homework, and the more tedious type

I was toying of not creating a new language, but rather just creating a framework  to run on something like the .NET (or newer, completely open source .NET core) platform, which hosts a bunch of languages (including a Python dialect, F#, and some more funky and 'esoteric' languages), and just provides the facilities for the basic solid geometry stuff, and outputting to known CAD/CAM file formats.

This would mean that you could use the full power of the language of your choice (and its existing libraries) among those that run on, in this case, .NET (mine would be C#), or similar, Java VM (the metaphorical guts of whose namesake language I literally hate, but hey, there's Scala, Kotlin, or even Clojure)

as opposed to being confined to some obscure freak language like OpenSCAD that might just not be your cup of tea.
It also would mean that people with different language preferences could all write higher level library extensions to do certain functions which then also people with other language preferences, within those running on the platform, could use it, making the possible cooperation much wider. Which I guess could help giving such an already niche thing some amount of traction.

Now, please somebody 'steal' this idea and make it happen, I'm not motivated enough. Right now anyway

Posted: 6/29/2020 7:51:43 PM
dewster

From: Northern NJ, USA

Joined: 2/17/2012

I'm not being 100% topical with your excellent thoughts tinkeringdude, but there was an interesting Hacker News article a month or two ago (which I unfortunately can't find now) about using a new language - it's not "just" (ha!) learning the syntax and the way the language constructs free / constrain / shepherd the programmer (the formal things we think about re. "learning a programming language") - but also coming up to speed on the various (possibly competing) libraries and how developed / entrenched they are, the larger ecosystem (which is the "right" IDE to use and how painful is it to set up?), the support group and any camps / infighting, operating system integration (GUIs & widgets), etc.  It was nice to hear someone address all the crazy mechanical stuff that interferes with someone sitting down and coding, and on the off chance actually getting something done.

Posted: 6/30/2020 10:04:34 PM
dewster

From: Northern NJ, USA

Joined: 2/17/2012

Castles In The Air

To reduce the Ender-3 plastic reel friction, I cut down a plastic (HDPE? - seems like milk a carton) lint roller holder and stuck that on the spindle, and printed a filament guide.  The guide seems to want me to mount the reel support backwards, but it's all working better and I don't feel like I need to manually babysit it by periodically giving it slack.  This is a simple glaring issue with the Ender-3 that really should be addressed by the guys who make it IMO.  Not enough basic mechanical engineering...

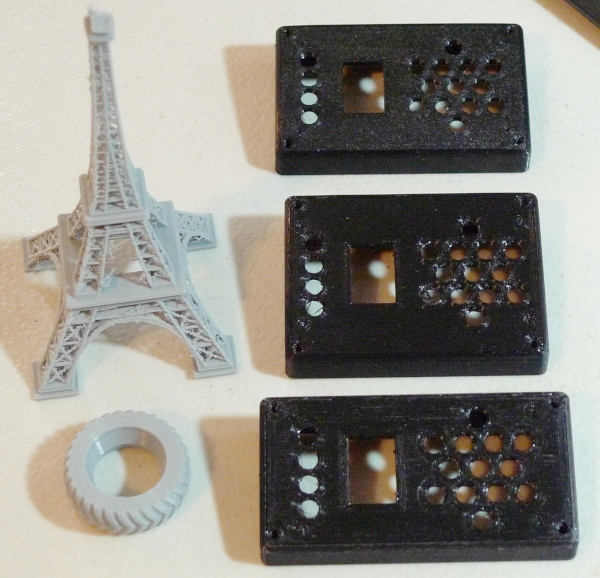
Also printed a more width-biased tuner doghouse at 1/2 scale.  Afterwards switched back to gray PLA and printed an Eiffel Tower:

The tuner doghouses are shown here historically top to bottom.  The top one won't actually fit the PWB, the middle will and is depth-centric, the bottom one the most recent.  I like the esthetics of the first one the most, the esthetics of the last one is in second place.

The Eiffel Tower was a disaster, many features printing with no support and tons of webbing (mostly it's just a really lame *.stl and I should have examined the slicing).  Briefly hit it with a heat gun and it started flopping over (PLA clearly can't stand much heat at all).  I got so demoralized I had to print a Tesla tire just to screw my courage up and get back on the horse.

Even hobby 3D printing is a full-time job!

Posted: 7/2/2020 6:52:08 PM
dewster

From: Northern NJ, USA

Joined: 2/17/2012

Life Size

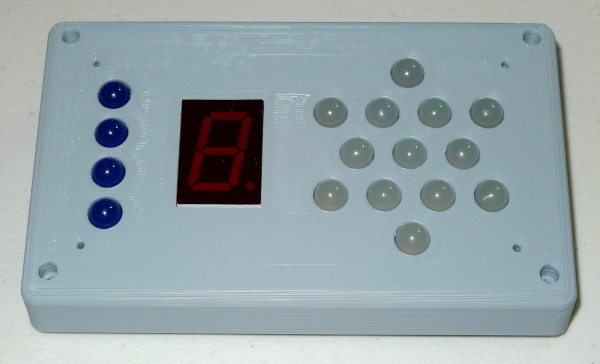
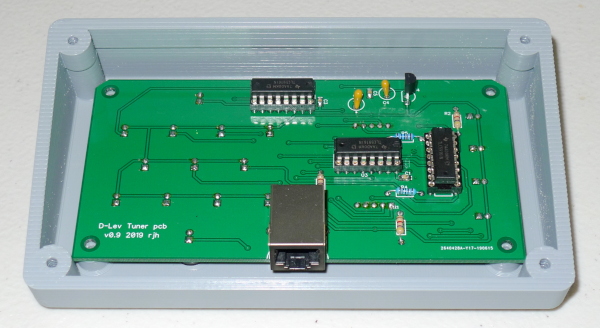
Lightly edited some dimensions of the tuner doghouse and printed it out full-size yesterday in gray PLA:

I had to unsolder & resolder the 7-segment display to make it flush with the PWB, haven't checked it yet to make sure it's still working.  Also had to file the upper corners off of the PWB to get it to fit, which was expected.  The 7-segment hole was too tight so had to file on that a bit too.  I'll have to remove the RJ connector and solder the wires directly to the PWB in order to make things fit.

Printed using the Cura "low quality" layer height of 0.28mm, stock 0.4mm nozzle, 25% cubic infill, about 30m of plastic (~1/10 of a reel, so ~$3USD).  The walls are 4mm thick with 4 layers all around (top & bottom, inner & outer sides) which seems like overkill - the doghouse is heavy and rigid enough to be a lethal weapon!  I think I'll reduce the overall height by 5mm or so.

This took 9+ hours to print, and at some point the Y-axis shifted by ~ 2mm.  You can see the ridge in the back in the lower photo.  I inspected the belt and motor and stuff and everything seems OK, so I'm thinking the Y-axis is moving too quickly for the stepper motor to maintain its torque grip on the absolute position.  Fun stuff. :-(

Posted: 7/2/2020 7:33:38 PM
tinkeringdude

From: Germany

Joined: 8/30/2014


This lists some common problems with regards to printing & speed, maybe some applies here

https://www.youtube.com/watch?v=3kW9SnK4LKc


Posted: 7/3/2020 5:24:09 PM
dewster

From: Northern NJ, USA

Joined: 2/17/2012

Thanks for that tinkeringdude!  He certainly has youthful enthusiasm going for him!  20% cubic infill is the default on the Cura slicer, and it can be quite rigid.  I think my issue is the acceleration / deceleration is too fast.  There are many settings both in Cura and in the Ender 3 itself for velocity, acceleration, and jerk, I'll have to play with them some I suppose.

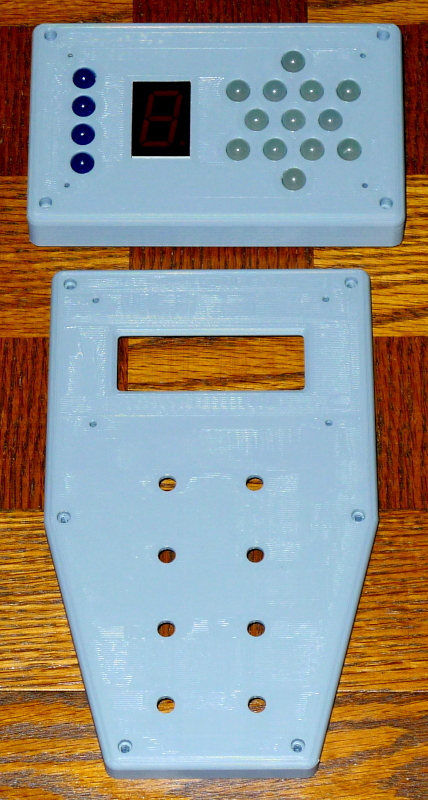
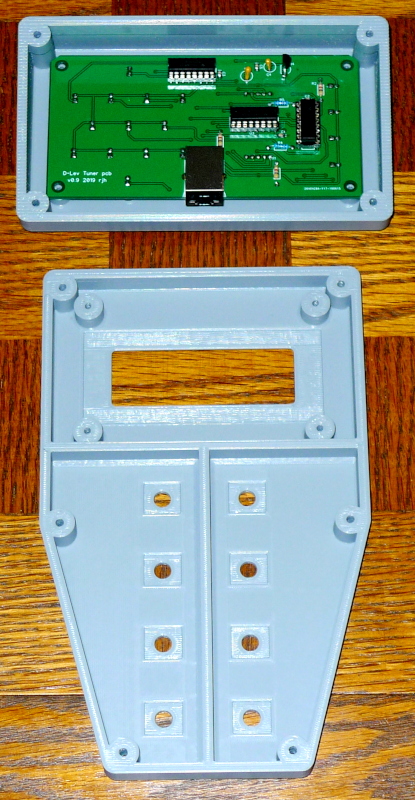
Last night I lightly edited the settings for and printed out the LCD & encoder doghouse full-size for the first time (shown here with my previous somewhat ill-fated print of the tuner doghouse at top):

This is 4 bottom layers (top layers actually, since it is printed out upside down), 2 top layers, 2 inner / outer walls, and 25% cubic fill.  It also took 9+ hours and 30m of filament.  The part is extremely rigid, I'm sure some plastic / time could be saved somewhere.  The main thing that turned out a bit wonky is the screw countersinks, which I may make conical (countersunk) rather than flat bottomed.  The slicer seems kinda blind / dumb as to what it just did one layer down, it often starts a layer at the worst possible point with no support underneath.

The whole infill thing is really interesting.  With it you can make "manufactured" type lightweight yet strong plastic constructs that you would never be able to purchase.

Posted: 7/3/2020 11:08:55 PM
pitts8rh

From: Minnesota USA

Joined: 11/27/2015

"The main thing that turned out a bit wonky is the screw countersinks, which I may make conical (countersunk) rather than flat bottomed.  The slicer seems kinda blind / dumb as to what it just did one layer down, it often starts a layer at the worst possible point with no support underneath." - Dewster

I often make countersinks where I really want counterbores, because countersinks print correctly without the strings and loops if they fall under the 45 (to 60) degree rule.  For larger screws where a counterbore is actually necessary I'll stick a support in there, but they still come out messy.

If Cura seems blind / dumb it's often because of all the knobs that they give you to twist not being twisted properly.  There are some really obscure settings with not necessarily intuitive names that can make huge differences. One thing that comes to mind is the Print Outer Wall First checkbox.  Having it checked can result in better looking outer walls and corners and I use it quite a bit, but if you have any overhangs it can cause the extruder to squirt into space like an unattended soft-serve ice cream machine. I'm now doing less experimenting by printing and more by zooming in on the preview and stepping through the movements in the software to understand the effect of some of the less common settings.

It can also help boost your spirits to occasionally get a second or third opinion by slicing with Raise3D's Ideamaker or PrusaSlicer.  They have plenty of options but are far less granular than Cura, and sometimes a problem print in Cura can come out looking fine in another slicer.  This in turn can help give clues to where the problem can be fixed in Cura.

Your modeling and prints are coming along though. Nice bosses too.  Your inside finish looks really smooth, almost like you had ironing on, but maybe it's just the lighting. If you want to experiment with painting it helps to print the first layer very hot and with a higher percentage flow, and this will make the infill lines coalesce to minimize the filling that you have to do.  Larger voids can be filled with automotive spot putty and sanded.  A final base of a few coats of sanding primer (each coat sanded down to progressively fill the lines) will form a decent base for some textured paint. 

Posted: 7/4/2020 2:56:50 PM
dewster

From: Northern NJ, USA

Joined: 2/17/2012

"I'm now doing less experimenting by printing and more by zooming in on the preview and stepping through the movements in the software to understand the effect of some of the less common settings."  - pitts8rh

Indeed, in my 3-axis mill programming days this is what I did, but I had to do it in my head as simulators were just getting going (it was the stone age).  The layer by layer view in Cura is super useful, but each layer is presented statically.  Is there some way to animate a single layer, to see exactly how the nozzle will travel?  One can enable the view of transition moves, but I don't see anything in the settings, nor a plug-in, for dynamic simulation.

"Your modeling and prints are coming along though. Nice bosses too.  Your inside finish looks really smooth, almost like you had ironing on, but maybe it's just the lighting."

The top face is smooth enough, particularly since it will be hidden inside.

"If you want to experiment with painting it helps to print the first layer very hot and with a higher percentage flow, and this will make the infill lines coalesce to minimize the filling that you have to do."

I've got the flow and temps jacked up for the first layer, which does help to fill in the gaps.  That first layer is sooo critical...

"Larger voids can be filled with automotive spot putty and sanded.  A final base of a few coats of sanding primer (each coat sanded down to progressively fill the lines) will form a decent base for some textured paint."

I'd love to be testing painting, but I'm currently too chicken to visit Home Depot for the necessary supplies!  Except for the weird Y-axis shift (any advice there?) the doghouses are coming out fine, so I'm currently trying to conjure up the axis coil / antenna connector constructs (out of thin air).

Posted: 7/4/2020 7:15:58 PM
pitts8rh

From: Minnesota USA

Joined: 11/27/2015

"Is there some way to animate a single layer, to see exactly how the nozzle will travel?  One can enable the view of transition moves, but I don't see anything in the settings, nor a plug-in, for dynamic simulation." - Dewster

This is what I see:


The right vertical slider selects the layer and the horizontal slider moves the extruder through all the paths in the chosen layer.  The play button to the left of the bottom animates all of the movements, although it doesn't move with the correct speeds and accelerations.  Do you not have these controls?

If not, there may be an issue related to the version that you are running, or the OS that it's on.


"Except for the weird Y-axis shift (any advice there?)"

I forgot that you mentioned that earlier.  I see the line but I can't tell if it's a permanent shift.  Things to think about:

1) See if your bed wobbles.  I don't know how the Ender 3 is built, but if you have long screws going through compression springs down to adjustment wheels, there is plenty of opportunity for this to shift around.  On both of my larger printers I've had to tighten the adjustments to lower the bed quite a bit. This compresses the springs and makes the adjustable bed less able to flop around.  After doing this you will need to carefully lower your z-axis homing switch to lower the nozzle back to the proper spacing.

2) If it's an axis shift caused by a stepper motor missing a step, then the entire layer will be displaced and all subsequent layers will be displaced too, like a San Andreas fault line running through the piece.  The Y axis has more mass than the X, and if acceleration is high you can skip, but I doubt that this is your problem.

3) On large flat pieces the temperature differential between the bed layer and the top layers can make the part want to curl.  It's easy to get a slight curling at a corner, and if the part has any height this can result in a pretty obvious shift, much more obvious that the slight curling at the corner would seem to suggest.  But this would also be a permanent shift and not one that corrects itself at some point.

4) If you see a shift for just a few layers (or one) but then it corrects itself, suspect a loose hotend or belt slack.  Actually these are the first things to check, along with the set screw on the stepper motor pulley.  If your Creality hotend is attached like mine, with two screws, keep a close eye on them.

5) If you have a single layer (or even some areas within a single layer) that is out of place and everything beyond that is fine, don't rule out a g-code glitch.  I've gotten a few, and for no reason that I can think of.  Draw up and print a tall cylinder or square profile, something like 1/2" to 3/4" on a side, to test for mechanical or software problems quickly.

If you can describe the shift I can maybe provide some more focused answers.


Posted: 7/5/2020 3:43:38 AM
dewster

From: Northern NJ, USA

Joined: 2/17/2012

"The right vertical slider selects the layer and the horizontal slider moves the extruder through all the paths in the chosen layer.  The play button to the left of the bottom animates all of the movements, although it doesn't move with the correct speeds and accelerations.  Do you not have these controls?"  - pitts8rh

Wow, interesting!  No, on my PC the horizontal slider is missing.  From what I've read it's an OpenGL issue, the chipset video in my old mobo doesn't support v4.1.  Time for a new video card I guess (waa!).

"If you can describe the shift I can maybe provide some more focused answers."

It's like #2, the entire thing from an inch or so up shifted ~2mm and stayed shifted to the end of the print.  I gripped the bed and the X-carriage underneath but there doesn't seem to be any easy play there between them via the spring knobs (though I do see what you're talking about).  The Y-axis belt was riding slightly to the right side on the front idler, and I played around its bolt so it's running more or less in the middle now, but I kinda doubt that was it.  It's got me a little skittish / gun shy.

You must be logged in to post a reply. Please log in or register for a new account.