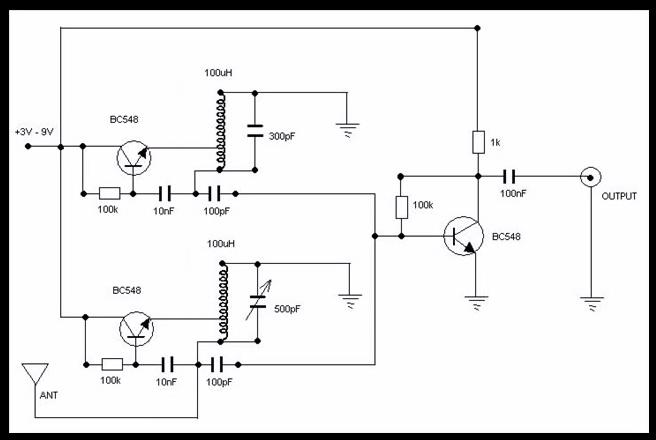
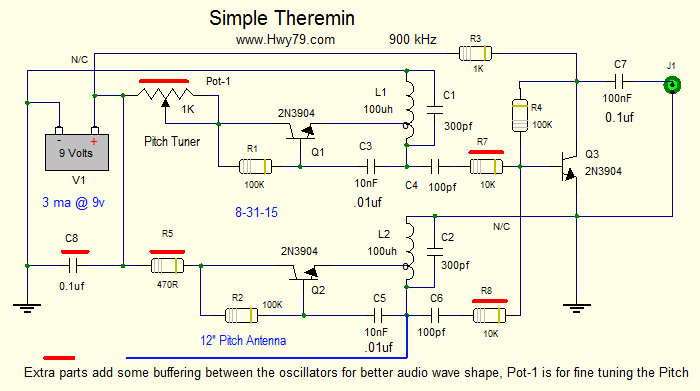
Wow! Thanks for all the great feedback folks!
I disappeared this weekend, and drove to visit a couple of friends who work in electronics in neighbooring towns to help me trouble shoot in person.... have not quite achieved perfection, but we made progress and discoveries! Here is the update and replies to your feedback!
Dewster: I would have started on a breadboard (to date most of my experience has been either on breadboards or direct wire to wire projects with no board)... however, at several points in the Thierrymin thread people said not to use breadboards or stripped vero board because the strips would create interference... so I assumed breadboard was out of the question... In hindsight... I should have set it up that way anyway! Next time.
Senior Falcon: Yes, when I sweep through the variable capacitor I get a full range... however, there is some crackling noise at some points... and there are two points along the sweep that give good clean sound... so the variable cap sweeps through a range of pitches smoothly from low to high with a bit of noise, but at two points (one low and one high) the sound becomes very clear.
Dewster: YES! antenna to coil. Just reading your comment now, but on the weekend, when I met with Rob, one of the things we tried was connecting the antenna to the tap of the coil in the VPO, and it worked! Albeit backwards... low pitch was closest to the antenna, high pitch was further away... then it suddenly stopped. More details about that below when I summarize what we tried and what happened.
I like the terminal strip suggestion too... I tried to buy some from a local electronics repair shop... but they had none... I'm sadly going to give up on trying to buy the electronic components locally and start ordering online. :-(
Christopher: Rob also suggested putting some metal in the coils... When we dipped a nail in and out of the VPO coil, we got surprisingly clean sound, passing through the full range of pitch... low to high and high to low... very clean and clear... like what happened with adjusting the variable cap, but with no noise (at that point we had removed the variable cap and replaced it with a small 100pf cap. It was really cool... but the antenna still didn't work... however, I might later on rebuild this circuit with the express intention of playing it by dipping a nail in and out of a coil... because that is also pretty cool... surprise discovery.
and AM radio, YES! I'm not quite entirely clear on what you were suggesting I do... however, at one point in our trouble shooting, the amp that the circuit was plugged into started picking up radio... I can't remember what we did to the circuit when that happened, but when we undid it, the radio stopped.
and YES! I would love to invite you all over for a BBQ! But I think we all live pretty far apart... however, I'm travelling down the east coast this fall and would gladly buy a beer or a coffee for any of you who are on my route! :-)
Senior Falcon: yes, that's right... I'm just trying to make this circuit work... if Caglayan can make it work, I should be able to as well. As long as that schematic actually reflects what he built....
Christopher: You are adding to my homework! But it's good... So, now I will try building that one too... Here is my order now: 1. Caglayan (keep trying to get it to work!)... 2. Thierrymin (build it)... 3. Hartley Oscilator Simple Theremin (suggested by Christopher just now... build that one too)... 4. PAiA Theremax (build it)... 5. Etherwave Plus (assemble it... the PCBs are sitting on my work bench... but it was so expensive that I don't want to solder any of those connections until I've built these other ones... I want to make sure that my soldering skills are up to snuff before I touch those puppies)
Finally, here is the update on what I tried and discovered over the weekend of trouble shooting with Gavin out in Sainte-Antoine and with Rob in Saint John (both of whom are experienced electronic instrument builders and musicians... and very very generous souls who offered to help me out in person *** I should add that I squeezed meetings with them into a very tight schedule... so I only had 1 hour with each of them... in that short time, there is a chance I may have misunderstood or wound up misquoting certain aspects of their advice... so if there are errors in our findings, they are likely mine):
1. Tools, circuit, and soldering: Gavin inspected my soldering and my circuit and my tools that I was working with. I learned some great tips! I was running my iron too hot. My solder was a bit too thick for the job (working with 1.2mm when 0.6 or 0.8 would do). A few of my joints had lifted from the board. And I should try to keep my circuit components tighter and closer together (less spread out... which would mean shorter wires as Christopher suggested earlier in this thread). He also suggested I solder terminals to my board, instead of the transistors, so that if I need or want to try flipping them... it's easier, and I'll be less likely to burn them out when attaching.
2. Transistors: Upon inspecting the circuit we discovered that there was a problem with my transistors. I had bought them from a local electronics repair shop, they do sell components, but they often seem annoyed to go looking for them in the boxes out back... there were no data sheets, and the guy at the shop wrote the pin order on a piece of paper for me... as CBE... so I installed them that way... when checking the voltage, something seemed off, so we looked up their data sheets online... the pin order is actually EBC. So, it appears that they were in backwards. (tansistors were BC547 and not BC548 like the schematic - the shop told me they were equivalents)
So, I snipped off the transistors, and put 3 new ones in... the proper direction, and resoldered them to the now growing solder blobs... and... it sounded better! However, the transistor in the FPO got very hot, and the one in the mixer got warm... the one in the VPO didn't get hot.
So.... I'm not sure what that's about... I'll double check the pin order online again... and who knows... maybe the schematic had one or two of them drawn in backwards? I'm taking the schematic as gospel... but maybe there are some errors in it...
3. Coils - Rob suggested we put nails in the coils. That made the sound louder, but the antenna still didn't work. However, moving a nail in and out of the VPO coil offered control and the ability to sweep through pitches. I shot a video of that to share with you all... but somehow the video didn't record... witchcraft!
4. Variable Capacitor: adjusting this, sweeps through the range but there is some noise, and the antenna offers no control. So, we tried two other variable caps. same thing. we swapped out the cap for a small 100pf cap and that worked better - cleaner sound, and that was what allowed the nail in the coil to offer control.
5. antenna: after switching the transistors, and replacing the variable cap with a 100pf cap.. we tried connecting the antenna to the tap on the VPO coil... and ta-da! the antenna offered control... about 12 inches around the antenna worked... but it was backwards... close to the antenna gave a low sound and further away was higher pitch.
6. sudden silence! but then, in our glee at getting the antenna to work... it all of a sudden stopped... no sound at all... silence... and that was the moment that the transistor in the FPO was super hot! almost burnt Rob's hand... and we checked the other two... and the transistor in the mixer was warm, and the one in the VPO was cool. Perhaps it was the quick and dirty job attaching the new transistor... or maybe that one should have stayed in its original position.
So... next steps: I'll check my transistors again... flipping them yielded results... but that FPO one shouldn't have gotten hot... I wonder if it was wrong on the schematic. I will try flipping that one around. I'm also using BC547 (because that's all the local shop had, and they said it was equivalent to the BC548 on the schematic)... I'll order some BC548s.
Parts: I'm sadly going to give up on getting them from the local repair shop here in town... it is always an ordeal when I go in there, while they look for the parts... (they're a repair shop... not a supplier after all)... they often give me "equivalents" instead of exactly what I'm looking for... and they are way too expensive... so, today I will place an order online... and get these parts again... and try building from scratch, as I think my solder blob are making repairs a bit unweildy.
and there you have it... progress... but not perfection... it gave me hope though... so I'm going to keep trying to make this one work!


