I was hoping for some help with an R.A. Moog Melodie Theremin that I was just given.

Posted: 10/28/2017 6:33:24 PM
kiaya611

From: Lebanon, OR, USA

Joined: 10/28/2017

Hello all,

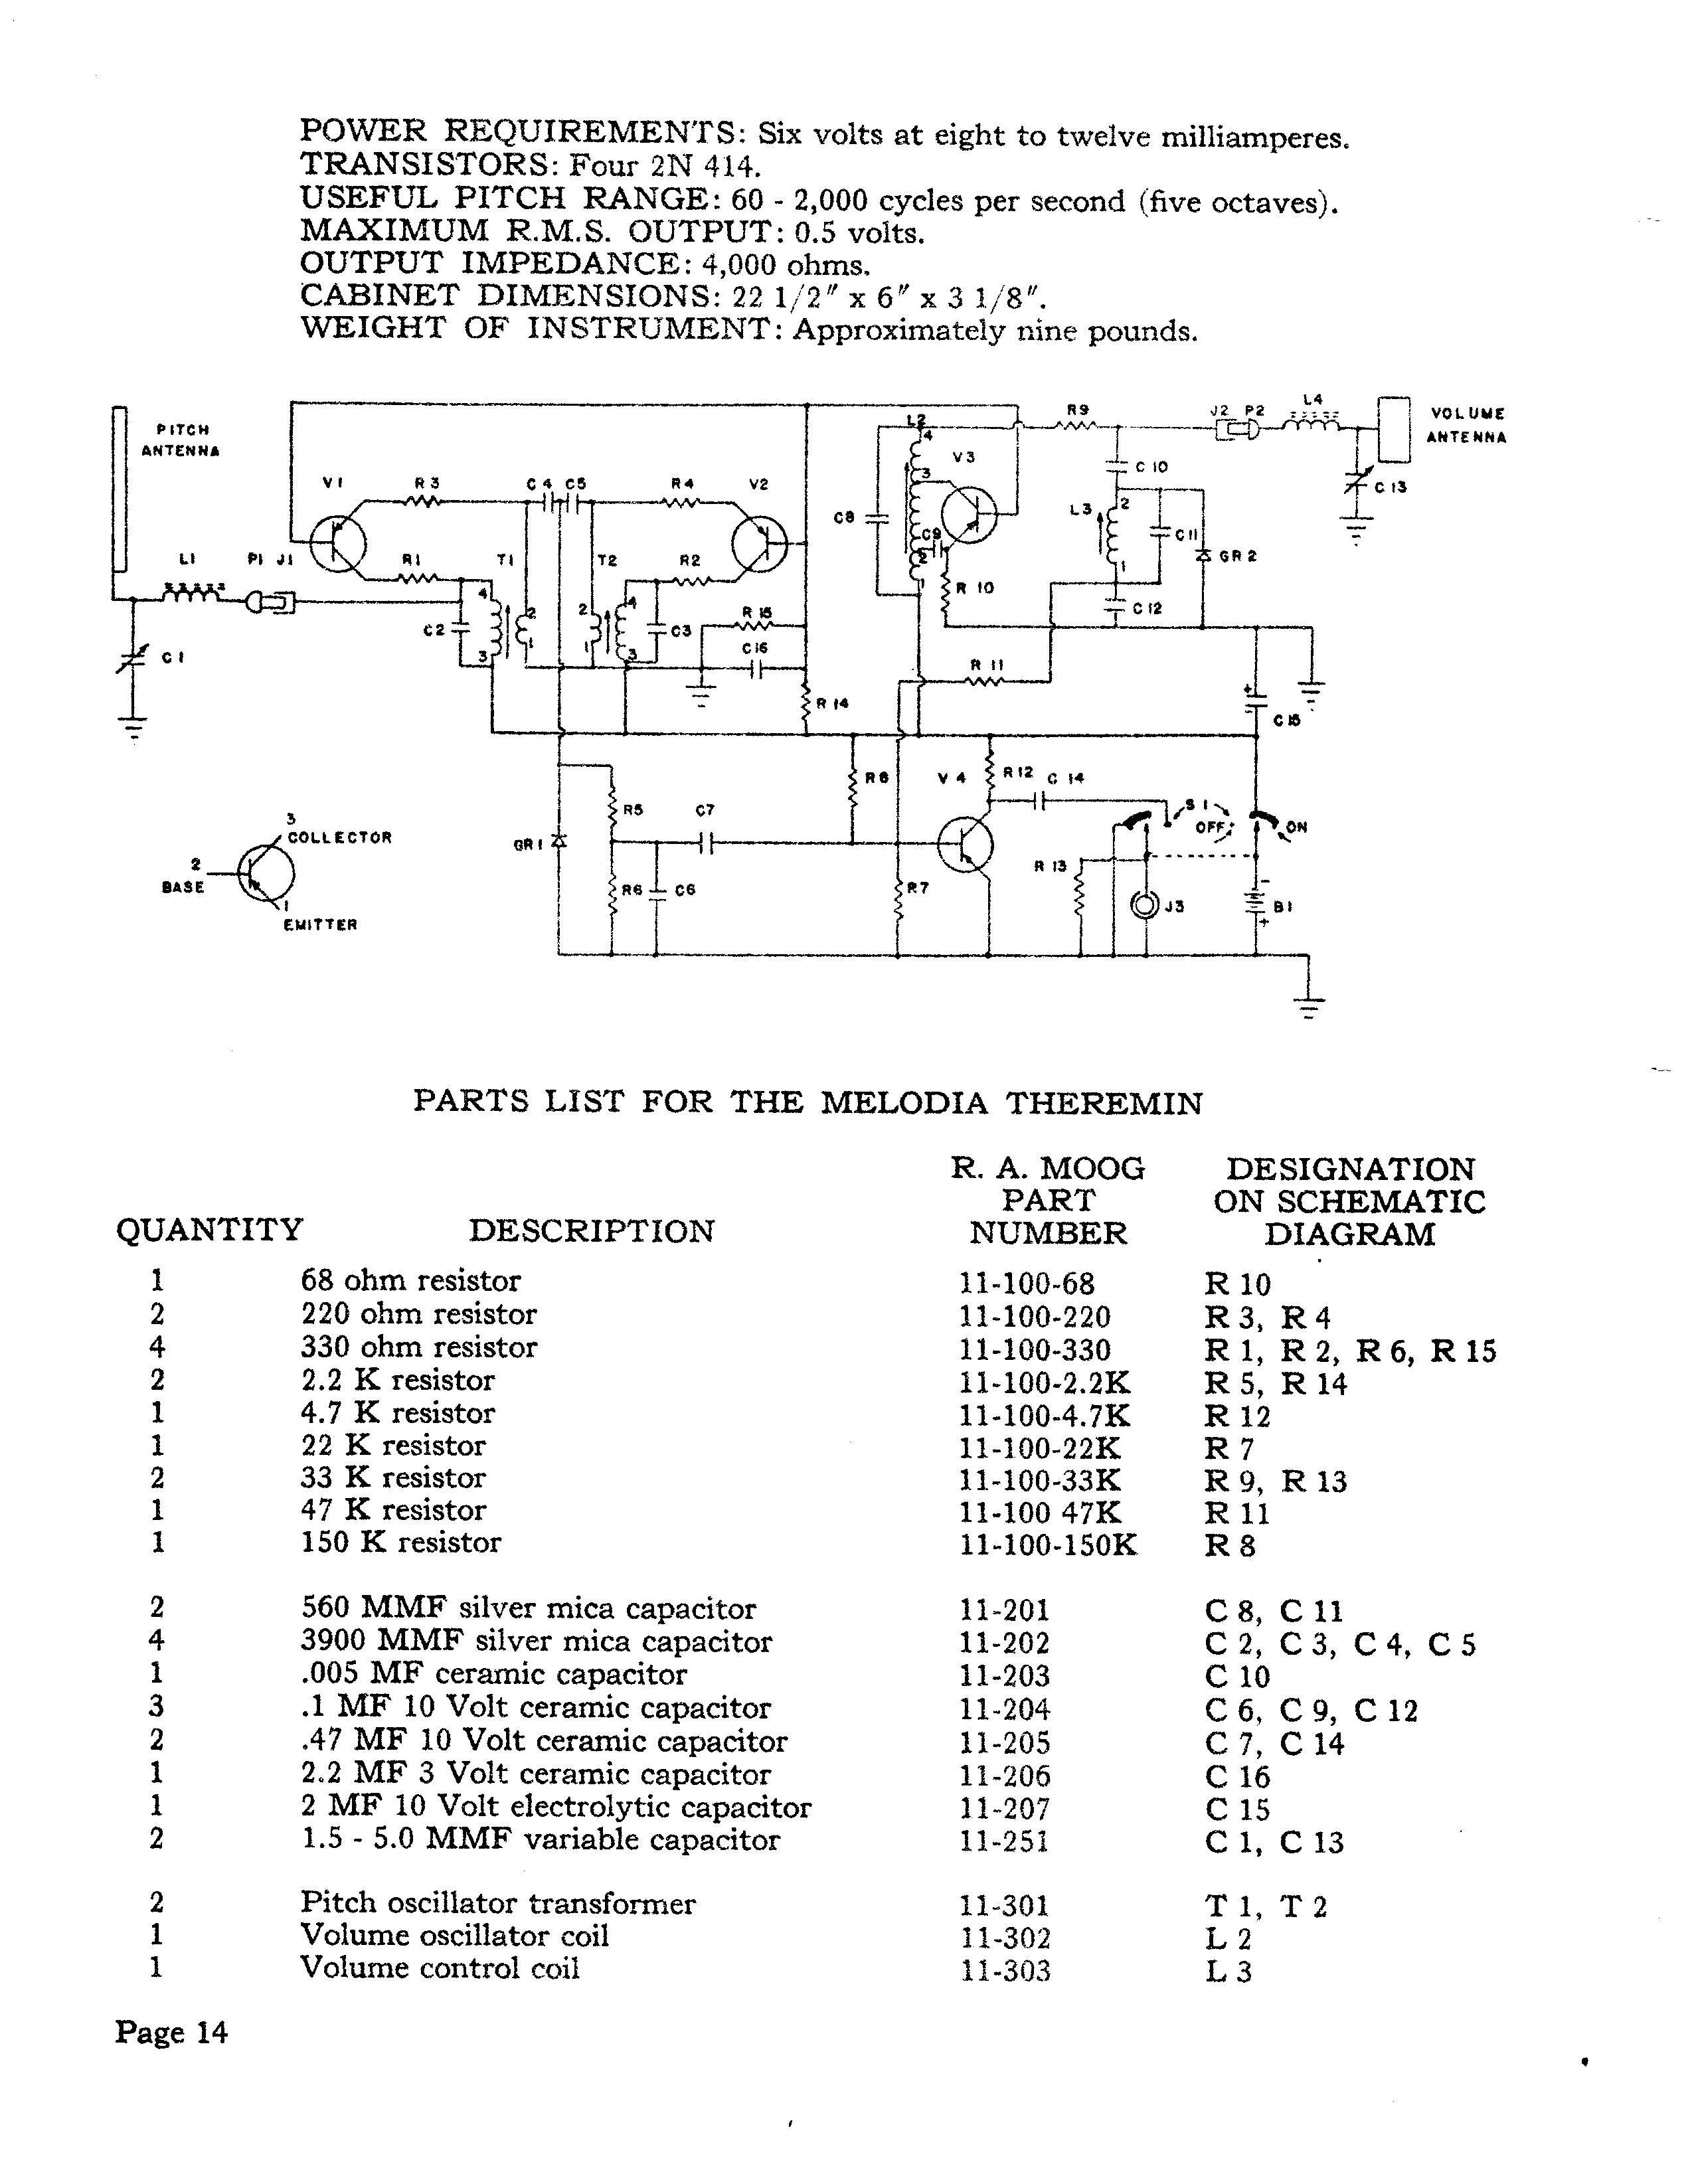
I am new here and do not have any experience with Theramins to date, although I have always been facinated with them.  My background is with pipe organs, reed organs, early to modern organs, pianos (including player and reproducing) and automatic musical instruments (i.e. band organs or fair organs, etc.).  In the last organ pickup I was on, I found in a box, a wooden box with some knowbs and R.A. Moog / Melodie Theremin written on it and it had a couple of knobs on the front andwhat I am guessing is the antenna on the back with a hole on the right side for it to fit into as well as an RCA type audio output that I am guessing goes to am amp/speaker. There are also 2 holes on the lod that seeemed to have had something on it, but I didn't get a book or manual or any paperwork on it except for a letter insode fo the previous owner looking for information about it.

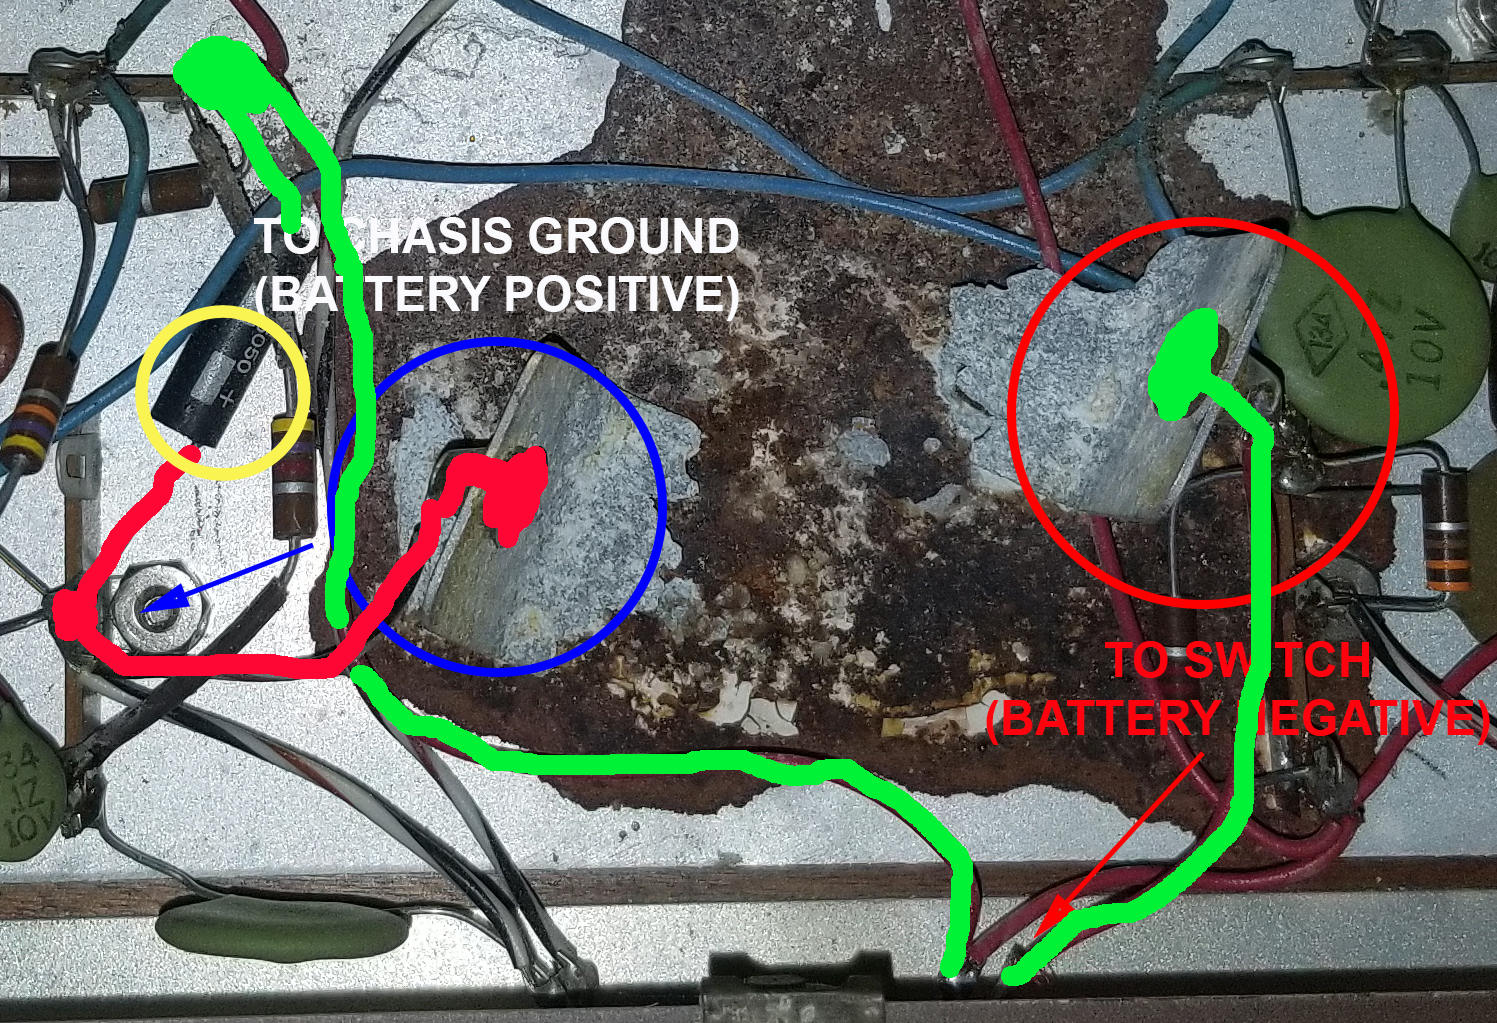
It was unfortunately stored with the battery inside and so there is damage to the inner metal case, although most of the electronics look to be in good condition.  My hopes are to clean this up, repair it and try my hand on something that has always facinated me.  I am going to try to include pictures of it (some with added text) so you could see exactly what I have and hopefully be able to help me out. Thank you very much, Steven  PS:  It seems that I don't know how to insert pictures to the post, so I will upload them and provide the link:  https://drive.google.com/open?id=0B20NnGIJDVbgVlRySVVjUlc2cUE

Posted: 10/29/2017 1:01:27 AM
dewster

From: Northern NJ, USA

Joined: 2/17/2012

Hi kiaya611,

I made a photo album here at TW of your photos:

http://www.thereminworld.com/album/untitled-album/16439?photo=16440

I believe you (or anyone else) can add to it if you like.

There is a construction manual for the Melodia here:

http://www.thereminworld.com/album/moog-melodia-construction-manual/15580?photo=15581

What level of electronic experience do you have?

My first inclination would be to hook a battery up to it and see what happens.  Be careful of polarity!

Posted: 10/29/2017 1:48:37 AM
kiaya611

From: Lebanon, OR, USA

Joined: 10/28/2017

Thank you very much Dewster, for the manual and fixing the pictures I posted (or tried to).  My soldering expereince is pretty good.   I am used to soldering most anything from the 1920s to the present (mostly organs, speakers and amps, but sometimes, old radios), although I don't like the precision needed for modern board repair. :)

I thought about trying to clean up that battery spill and make sure none of the components were damaged by the acid and then try it on power and see what happened.  I have read conflicting stories about the polarity issue...having to do with a magazine article written wrong using NPN transistors instead of PNP resistors and so I was going to follow the wire color in the cabinent with the RED wire looking to be connected to the POSITIVE side and the BLACK/WHITE wire being connected to chassis ground (NEGATIVE).  Does that sound reasonable looking at the pictures?  Thanks, Steven

Posted: 10/29/2017 2:12:18 AM
kiaya611

From: Lebanon, OR, USA

Joined: 10/28/2017

Dewster,  I was just looking at the Digikey battery pack and noticed that the battery POSITIVE in the picture goes to chassis GROUND (WHITE) and the battery NEGATIVE goes to the Switch, thus reversing my original thought without really looking at it yet.  Am I correct here?  Thank you, Steven

Posted: 10/29/2017 11:58:33 AM
mpampouras

From: Lausanne, Switzerland

Joined: 3/15/2005

Hello there,

You definitely have to clean the battery spill mess! Then I believe that you need to hook up an AA battery unit cause this battery system is now outdated. Other than that your instrument seems to be in a pretty good shape.

The bottom-left hole was supposed to be an output hole for an external battery unit or a wall plug -not frequently done- and you've guessed correctly the other two holes! The antenna hole is right, as for the other two small holes they could have been tuning holes (stick up a tuning tool etc.) but I don't think so as you have to open the instrument in order to tune it anyway. 

What looks special in your unit are the wooden stand legs! It's the first time I see one of these. So pretty!

There's quite a lot of documentation on Melodia online, I think you'll be able to restore it.

Posted: 10/29/2017 12:39:19 PM
dewster

From: Northern NJ, USA

Joined: 2/17/2012

From the manual:

It uses Germanium PNP transistors (I believe PNP is the superior choice for Germanium, whereas NPN is superior for Silicon).  PNP is kind of opposite world to NPN, so it's no surprise the chassis is tied to the positive lead of the battery.

If NPN versions exist then you definitely want to check the transistors for NPN or PNP before you connect the battery, a DMM set to read resistance or diode test can do this easily.

I'm no Melodia nor restoration expert, but as mpampouras says that battery corrosion should be cleaned up or at least neutralized so it doesn't cause more damage over time.  I believe the residue from leaky dry cells is alkaline, so you might use a weak acid like vinegar in the clean-up.  If there are no paper capacitors you might be able to immerse the chassis in water to help with the clean-up, then thoroughly dry it with a hair dryer (I did this once with an entire color TV chassis, guts and all).  The variable capacitors on the front panel might be a problem with water immersion?

You may end up replacing C15 as it is electrolytic, and those things don't age well.  I would replace it with a tantalum capacitor, perhaps in parallel with a 0.1uF ceramic.  You might consider including a series Schottky diode in the battery lead to keep reverse battery installations from killing your heirloom.

Posted: 10/29/2017 6:11:50 PM
kiaya611

From: Lebanon, OR, USA

Joined: 10/28/2017

Thanks for the help. I was thinking fo carefully getting a wire brush attachment for my Dremel (with the use of a vacuum very close to the area) and cleaning as much of the battery damage as possible and then neutralizing the area.  I will get a battery pack unit fo it to replace the old one and check out the other components and replace any faulty ones.  I am hoping this end up working, as it looks good except for the battery damage.

Posted: 10/29/2017 7:32:29 PM
dewster

From: Northern NJ, USA

Joined: 2/17/2012

Also, if you can read the polarity of the electrolytic C15 that should tell you how to wire the battery: if the negative lead is wired to the switch and the positive lead is wired to the chassis then wire the battery the same (battery positive to chassis).  Otherwise reverse.

Posted: 10/29/2017 8:23:20 PM
kiaya611

From: Lebanon, OR, USA

Joined: 10/28/2017

Here is the way I am reading what I have.  Let me know if it matches your thoughts.  Thank you.  Steven

POLARITY IMAGE  I still can't figure out how to insert an image in a post... :/

Posted: 10/30/2017 1:38:32 PM
dewster

From: Northern NJ, USA

Joined: 2/17/2012

I scribbled on it:

Red is positive, green is negative.  The tip-off for me is the circled '+' plus sign on the electrolytic capacitor going to the chassis.

There is a button at the upper right of the posting box with a mountain icon.  Click it and paste a link to your photo in the dialog box, and make sure you click in both constrain entry numbers if you change the size of one.  You can edit the photo dimensions later if you like by clicking on the photo and clicking on the icon again.

If you want the pix to stay here at TW, you can use the menu at the top of the web page, click Media, create a photo album, and link from there (right clicking on the album image should give you the option to copy the link).  Like most things, it's all a bit fiddly at first.

You must be logged in to post a reply. Please log in or register for a new account.